
neo is a cloud PDM system that takes a hardware team from scattered files to controlled releases in one workspace. You set up your nomenclature, bring in existing data, invite people with roles, and work on files through neoDrive. Your team proposes, reviews and signs changes in neo, and each approval produces a release dossier and an audit trail automatically, ready for production, suppliers and auditors.
The lifecycle at a glance
Each team configures neo a little differently, but the path from first upload to controlled release follows the same sequence:
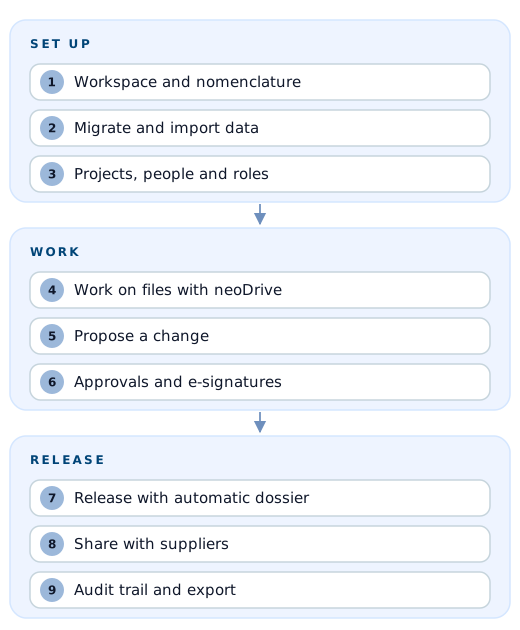
- Set up the workspace and nomenclature
- Migrate and import existing data
- Create projects and invite people with roles
- Work on files with neoDrive
- Propose a change
- Route approvals and e-signatures
- Release, with the dossier assembled automatically
- Share with suppliers through portals
- Rely on the audit trail, and export when you need to
A pilot usually follows the same order.
Step 1: Set up the workspace and nomenclature
A workspace is your organisation's space in neo. neo hosts it in the EU and protects the data with field-level encryption.
Your first decision is nomenclature: how you build part numbers and document IDs. Some teams want a running number; others encode product family or document type in the ID. neo's nomenclature is configurable, so the scheme follows your quality system.
Teams underestimate this step more than any other. A clear scheme makes search, structure and supplier communication easier for years. Our success team helps you define it before any data goes in, so you do not have to renumber later.
Step 2: Migrate and import existing data
Your existing data probably lives in some mix of:
- Spreadsheets with part lists and bills of materials
- A legacy PDM or PLM system
- CAD files on shared drives or local disks
- Quality records such as approved procedures and released drawings
The success team migrates this data with you. Historical data is typically inside neo within days, so your first projects start with real history instead of an empty system. Where old data is inconsistent, use the migration to agree on what you clean up and what you keep as is.
Step 3: Create projects and invite people with roles
You organise work in neo in projects. A project bundles the documents, parts and approvals that belong together, for example one product or one product generation.
Permissions inherit from the project, so you set access once and it applies to everything inside. Each person gets a role per workspace or project:
| Role | Typical user | What they can do |
|---|---|---|
| Read/Write | Engineers and document owners | Create items, check in files, propose changes |
| Read-only | Production, purchasing, management | View and search released information |
| Administrator | Workspace owner, quality lead | Configure nomenclature, templates and access |
On top of roles, permissions are granular: you set who can view, edit, approve and release separately. A quality manager can approve without editing; an engineer can edit without releasing. Read seats have no create or check-in rights, which separates the people who produce data from the people who consume it.
Step 4: Work on files with neoDrive
Engineers keep their usual tools. neoDrive is a desktop application that syncs local files into neo, including files from mechanical and electrical CAD systems, and it works across multiple platforms.
The day-to-day flow:
- You work on files locally, in the folder neoDrive keeps in sync.
- When a file is ready, you check it in to neo. neo keeps each check-in as a version, so you keep the full working history.
- Colleagues see the latest checked-in state in neo, with its metadata, status and history.
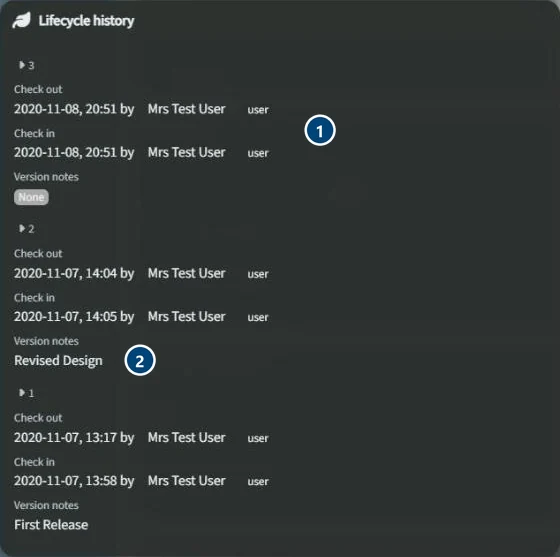 Each check-in becomes a version. 1: check-out and check-in with person and time. 2: a note on what the version changed.
neoDrive syncs files. It is not a CAD add-in, and it does not read assembly structures or references from inside your CAD system. The integrations page explains what that means for your setup.
Step 5: Propose a change
Once something is released, your team changes it through a controlled path. From any item in neo you can choose Propose change. The change request captures:
- What should change and why
- The impacted documents and parts, attached to the request
- The approval chain the change will follow
Impact analysis shows blockers before anything moves, so reviewers see what the change affects and what stands in its way. Metadata links every artifact to the change it came from, so later you can answer "why is this revision different?" without searching email. Read more about engineering change management.
Step 6: Route approvals and e-signatures
neo routes the change request through a configured approval chain. Reviewers get notified in neo and by email, and dashboards and role-based alerts show who is waiting on what.
Approvals can run in parallel across engineering, quality and suppliers, so a review only waits on one person after another if your process requires it. Approvers sign with validated electronic signatures, with audit trails designed to meet 21 CFR Part 11 requirements; this supports FDA, ISO 13485 and ISO 9001 style document control.
Configurable templates check that a document set is complete before it can move forward. If your process says a release needs a drawing, a test report and a risk assessment, you see a missing item before approval.
Step 7: Release and the automatic release dossier
When the last approval is in, the change is released. neo then assembles the release dossier automatically: the metadata, the signatures and the artifacts that belong to that release, in one package.
You can export the dossier to PDF and share it with auditors. For regulated teams this step changes the most: neo produces the evidence for a release as part of releasing it, and nobody has to collect it by hand before an inspection.
Step 8: Share with suppliers through portals
You share released information with the people who build the product through supplier and customer portals with granular permissions instead of emailing attachments. External partners see only what they need, such as the released drawings for the parts they make.
The portal shows released revisions from neo, so a supplier stops building from an outdated PDF someone emailed months ago. Suppliers can also take part in approvals where your process includes them.
Step 9: Audit trail and export
neo records every action in complete audit logs: who did what, and when. When an auditor, customer or notified body asks for the history of a part or a document, you look it up instead of reconstructing it.
Your data stays yours. You can export all data at any time, whether for an archive, an audit or a move to another system. Read more about engineering document control.
What a typical rollout looks like
Most teams are productive in neo within a few weeks. A typical rollout:
- First days. A kickoff with the success team, agreement on nomenclature and project structure, and the start of data migration.
- First week or two. Historical data is in neo. A small group of engineers runs a first project with neoDrive, and you configure the approval chain to match your process.
- Following weeks. You invite the rest of the team, bring quality and suppliers into approvals and portals, and take the first changes through to release.
You can run this as a free 3-month pilot and see neo work on your own files and process before you commit. After go-live, every customer has a success manager with quarterly reviews, and the people who built neo handle support, with a reply within one business day and usually the same day.
Getting started
To see these steps with real data, take the product tour, look at pricing, or talk to us about a pilot with your own files.